Port Forwarding with Public IP
In Ananta cloud platform, an additional Public IP enables you to expose internal services hosted on instance to the internet by creating dedicated port forwarding rules. This approach is especially useful when multiple external IPs are needed for services such as SSH, HTTP, or custom applications. By assigning specific public IPs to particular services or instances, you can achieve greater control, flexibility, and network segmentation.
The following are the high level steps required to configure port forwarding with Public IP:
- Adding Public IPv4 Address
- Adding a Port Forwarding Rule
- Configuring Port Forwarding in pfsense
- Verifying the Functionality
- Web and SSH Port Forwarding in pfsense
- WAN Rule at pfsense
Adding Public IPv4 Address
To enable external connectivity for your services through a NAT Gateway, you must allocate a public IPv4 address. This address serves as the entry point for inbound traffic and is essential for setting up port forwarding or other external access configurations.
The following steps guide you through the process of navigating to your NAT Gateway, generating a new public IPv4 address, and verifying its successful addition and availability within the Ananta cloud platform:
- Navigate to the NAT Gateways section from the left-hand menu.
- Select the desired gateway.
- Click on the IPv4 Addresses tab from the option on the left. The following screen appears:
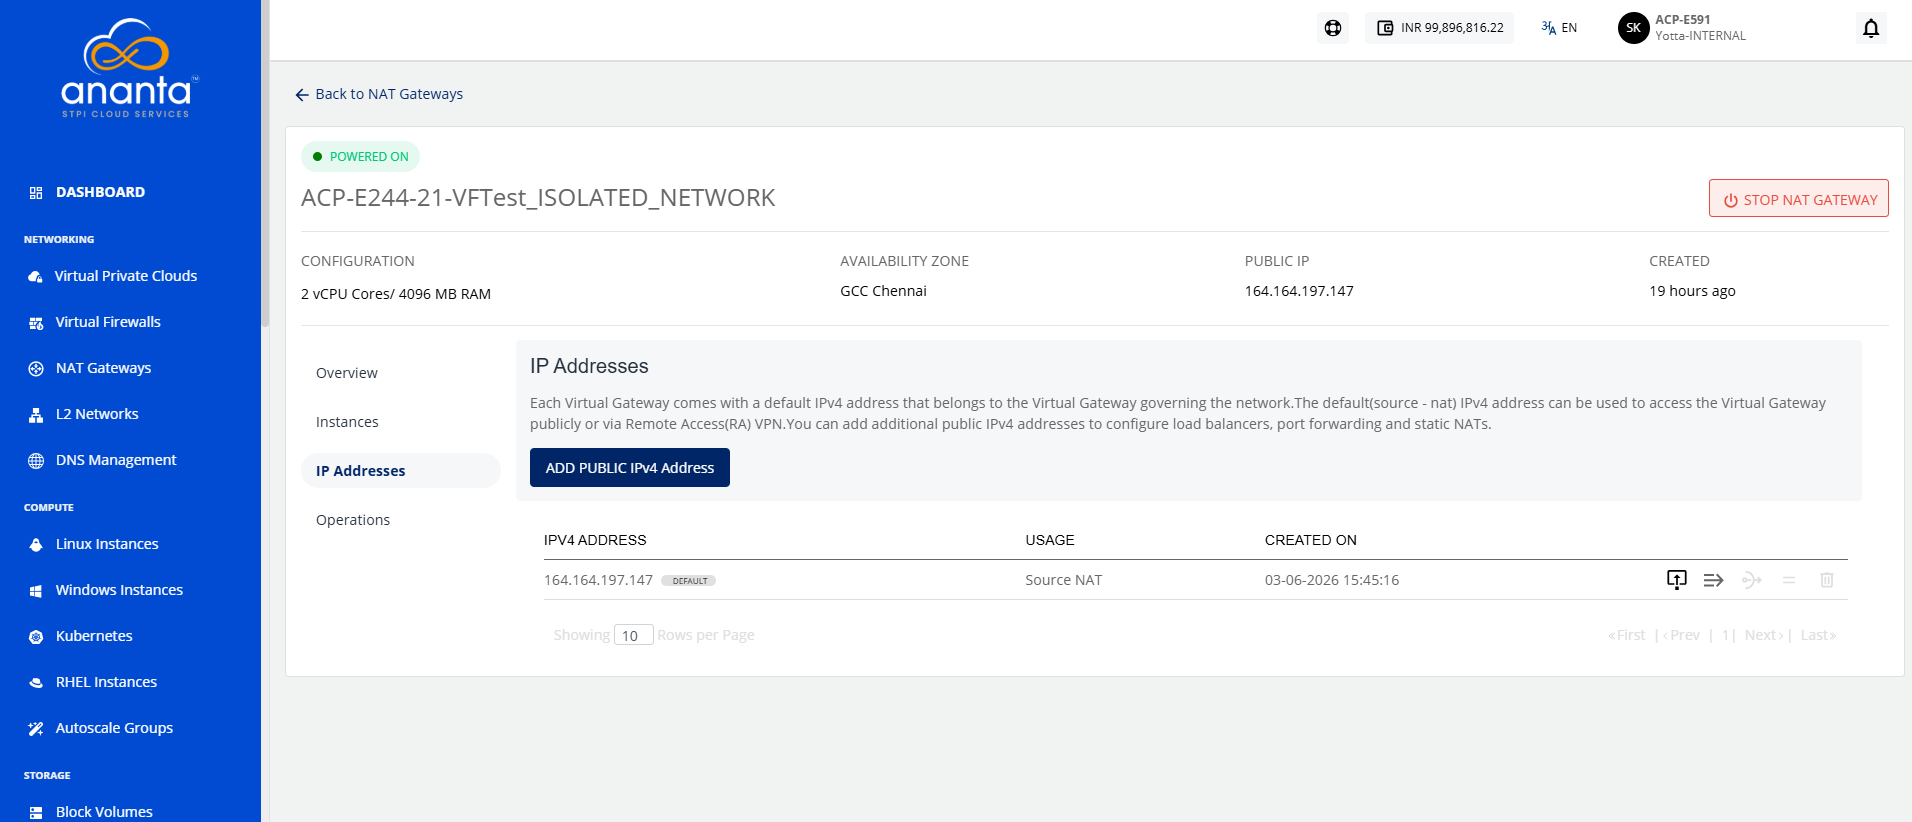
- Click the ADD PUBLIC IPv4 ADDRESS button.
- Click Confirm Purchase.
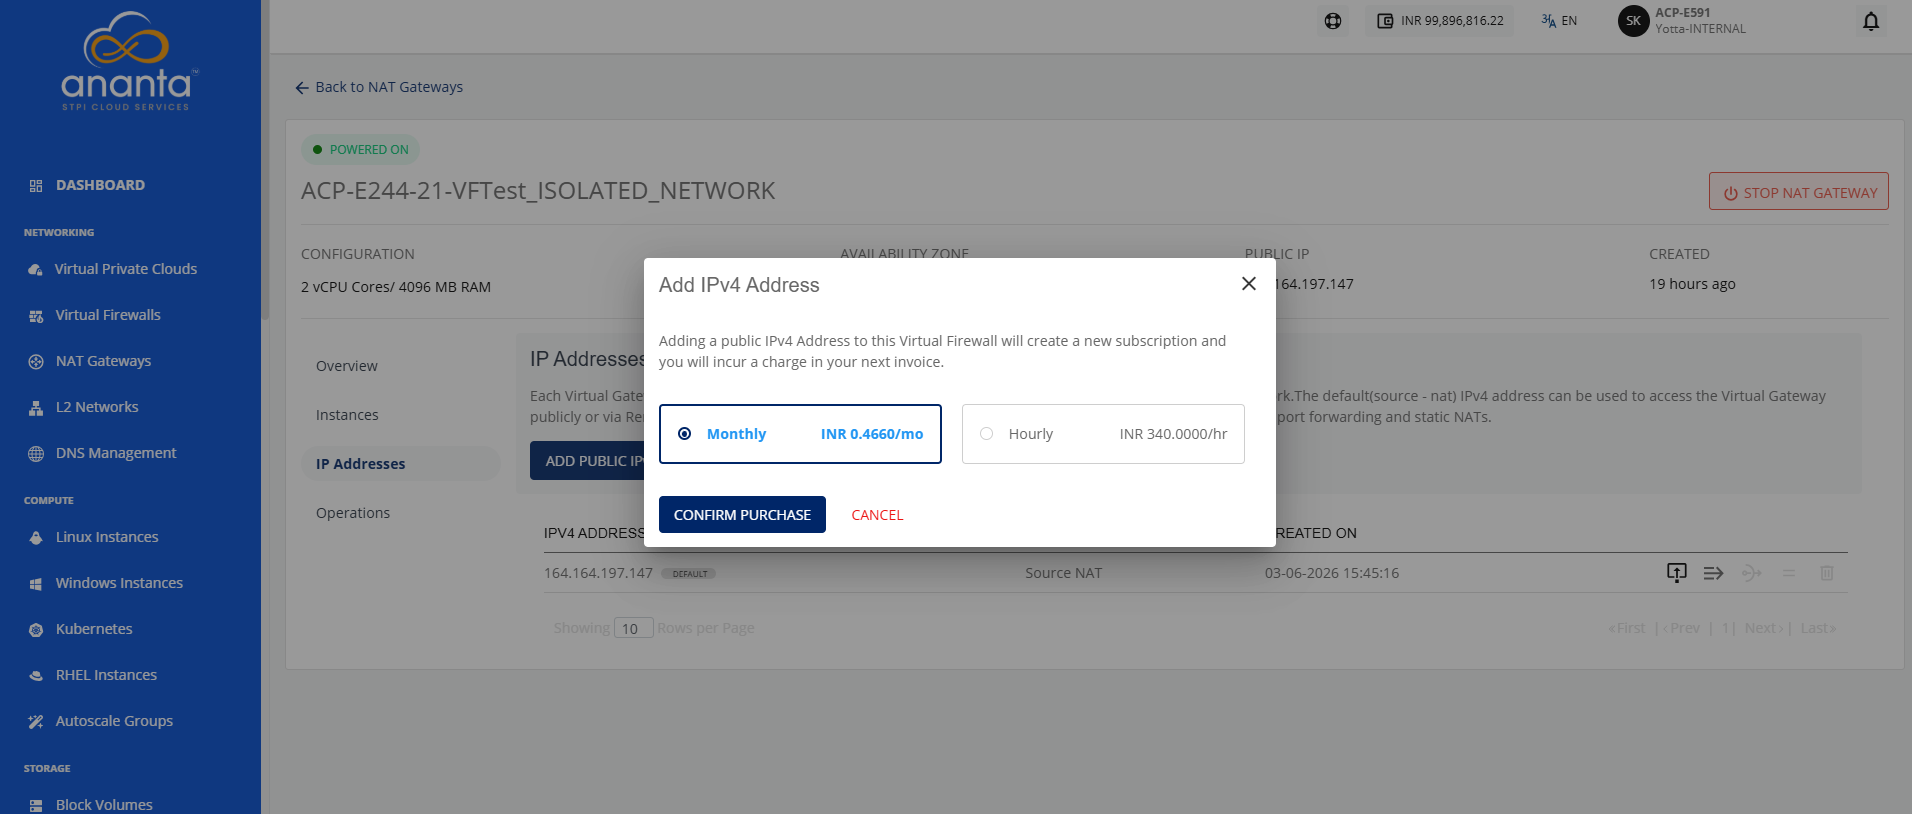
A new public IP is generated and listed under the IPv4 ADDRESS section. A confirmation message IPv4 Address purchase successful appears at the top. The newly added IP shows the status as Unused.
Adding a Port Forwarding Rule
Once a public IPv4 address has been successfully added to your NAT Gateway, the next step is to configure port forwarding. This enables external access to internal services by mapping incoming traffic on specific ports to designated internal IP addresses within your network.
The following steps guide you through locating the unused public IP, accessing the port forwarding interface, and initiating the configuration of a new port forwarding rule using the Ananta cloud platform:
- Navigate to IPv4 Addresses: In the left-hand menu under Networking, click on IPv4 Addresses
- Identify the Newly Acquired Public IP: Look for the public IP address that is marked as Unused under the USAGE column.
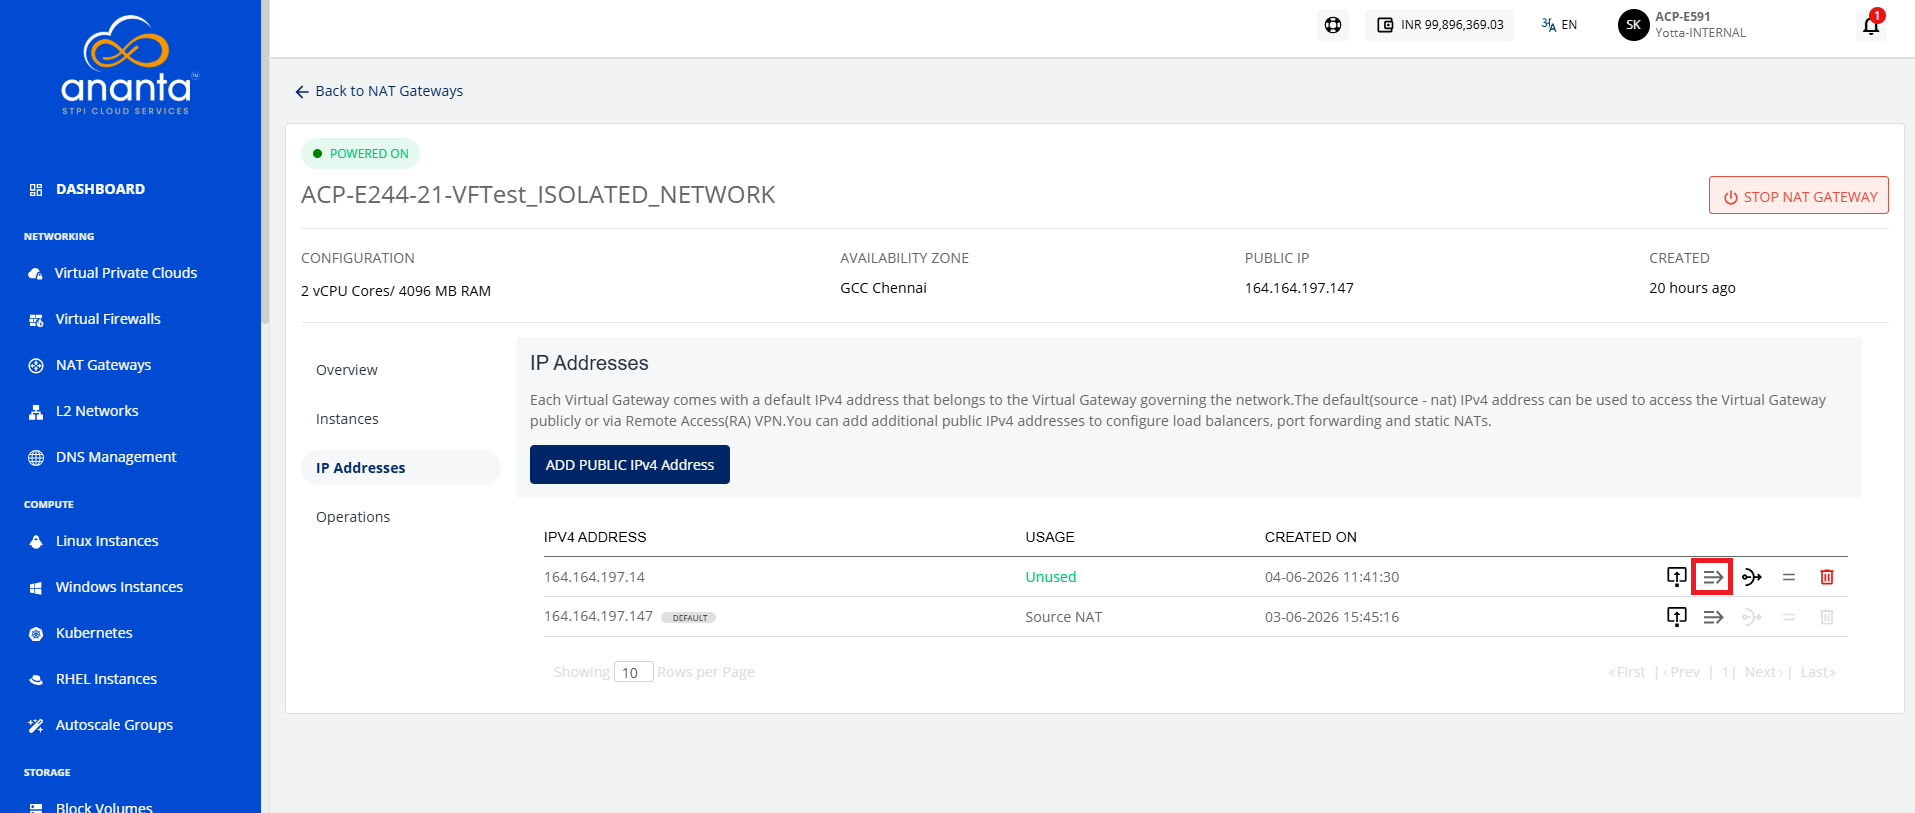
- Click the Port Forwarding Icon. The following screen appears:
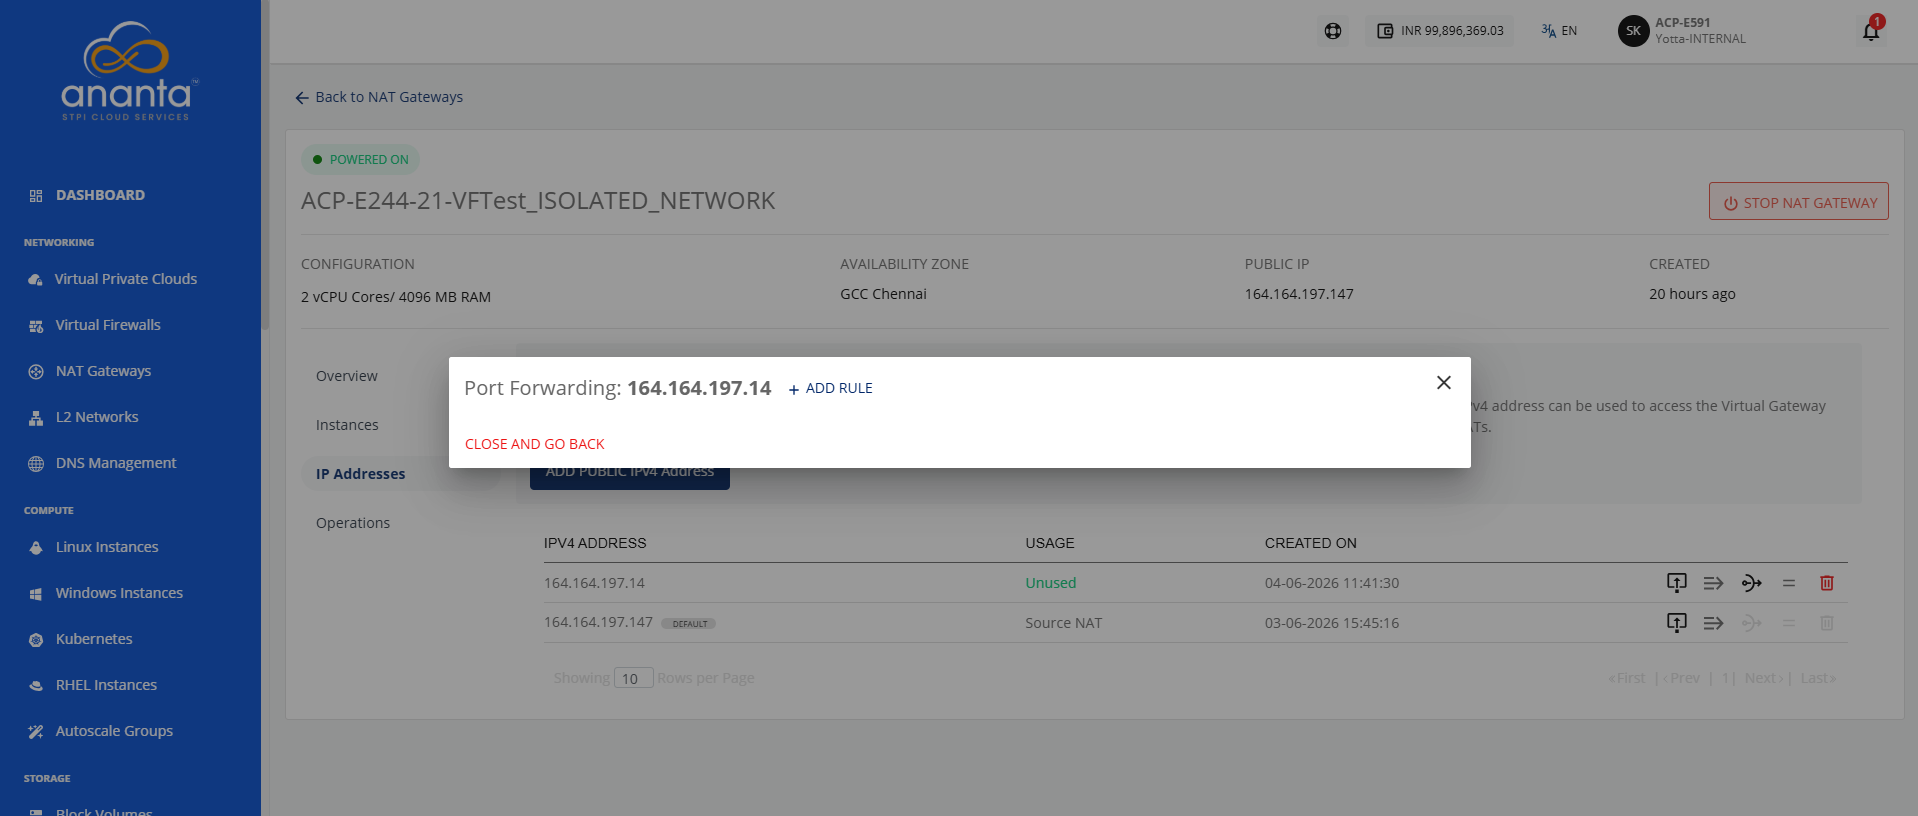
- Click Add Rule. The following screen appears:

- Provide the following details:
- Protocol
- Tier
- Instance
- Select IP Address
- Public Start Port and Public End Port
- Private Start Port and Private End Port
- Click the Add Port Forwarding Rule button.
Configuring Port Forwarding in pfsense
To enable external access to internal services through specific ports, you must configure port forwarding rules within the pfsense firewall. This setup maps incoming traffic on a designated public port to a private IP address and port within your internal network, ensuring controlled and secure connectivity.
The following steps guide you through logging in to the pfsense interface, navigating to the NAT configuration section, and defining the required parameters to create an effective port forwarding rule:
- Login to pfsense:
- Open a browser and navigate to
https://<pfSense-IP> - Login with the appropriate credentials.
- Open a browser and navigate to
- Navigate to NAT Configuration:
- Navigate to Firewall > NAT.
- Click on the Port Forward tab.
- Click the Add button (typically + icon) to create a new port forward rule.
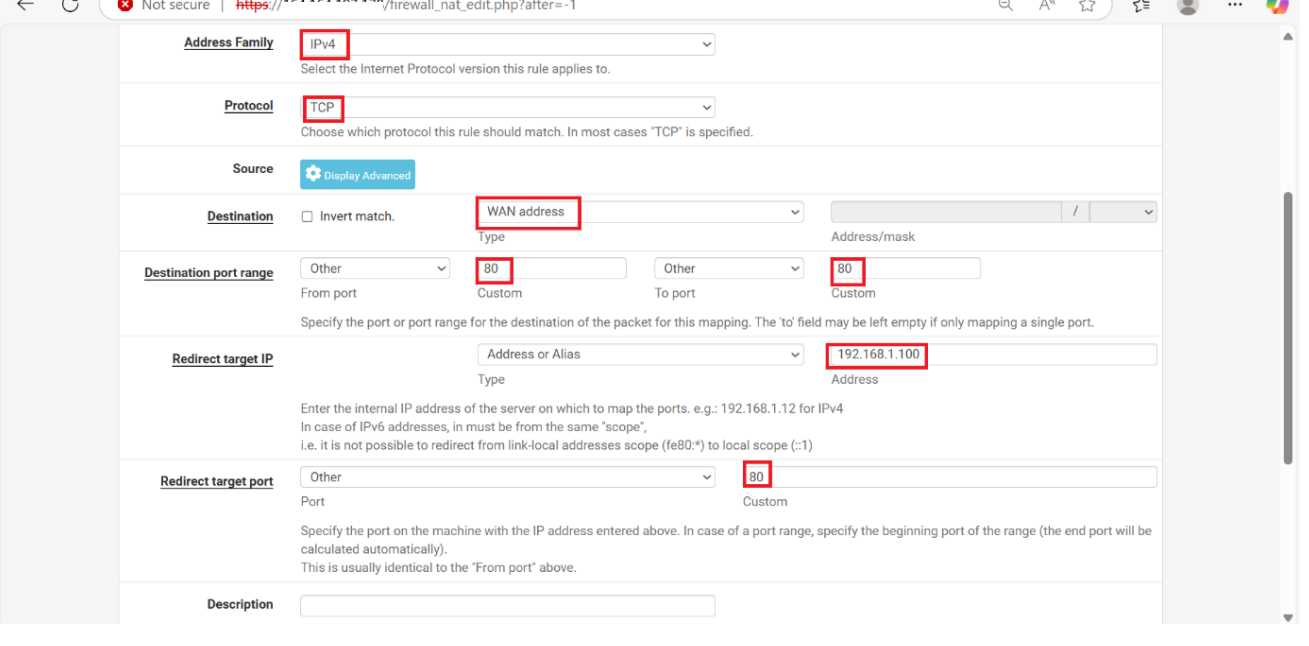
- Configure the Rule Parameters - Fill out the form with the following values:
- Address Family: IPv4
- Protocol: TCP
- Destination: WAN address
- Destination Port Range:
- From: 80
- To: 80
- Redirect Target IP: 192.168.1.100 (internal server IP)
- Redirect Target Port: 80
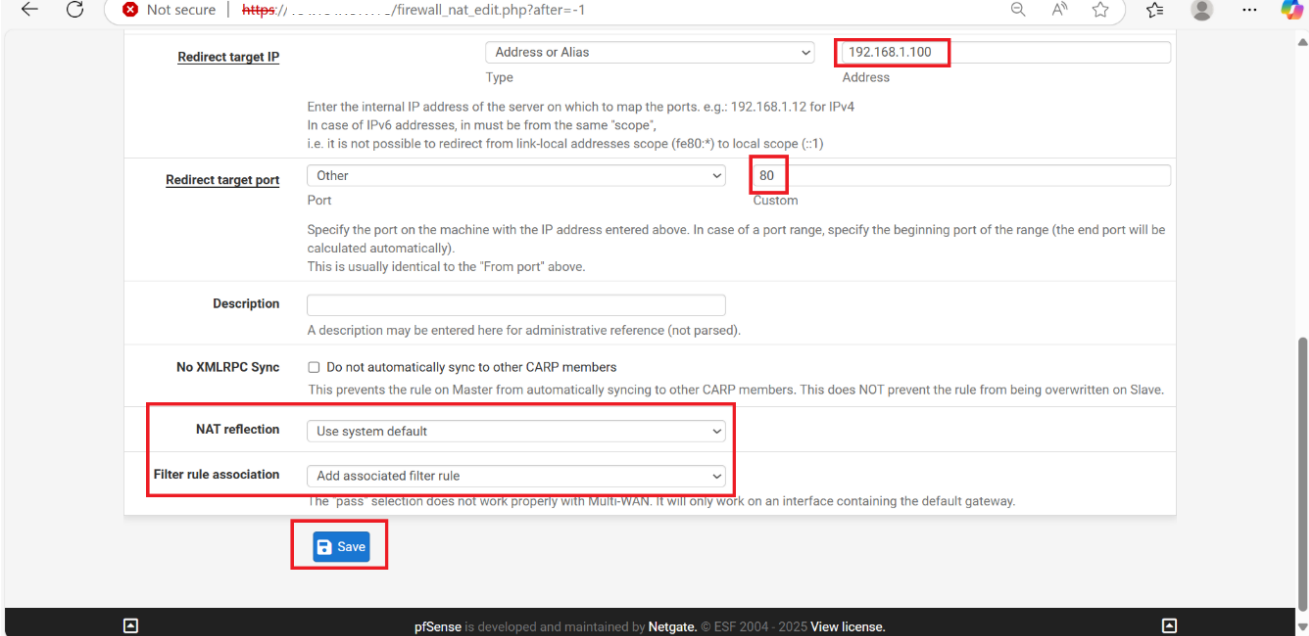
- Advanced Settings (Optional but Recommended):
- NAT Reflection: Use system default
- Filter Rule Association: Add associated filter rule
- Click the Save button.
Verifying the Functionality
After configuring port forwarding, it is essential to confirm that external traffic is correctly reaching your internal server. This validation ensures the rule is functioning as intended and that services hosted on the internal machine are accessible via the public IP.
The following steps help you to verify the port forwarding setup by accessing the public IP through a web browser and confirming that the expected web page (such as the Apache2 default page) is displayed:
- Open a Web Browser.
- Type the newly assigned public IP into the browser’s address bar.
- Check for Apache2 Default Page.
- If the port forwarding is correctly set up, see the Apache2 Default Page with a message displaying It works!
- This confirms that the request to the public IP is successfully reaching the internal web server hosted on the target machine.

Web and SSH Port Forwarding in pfsense
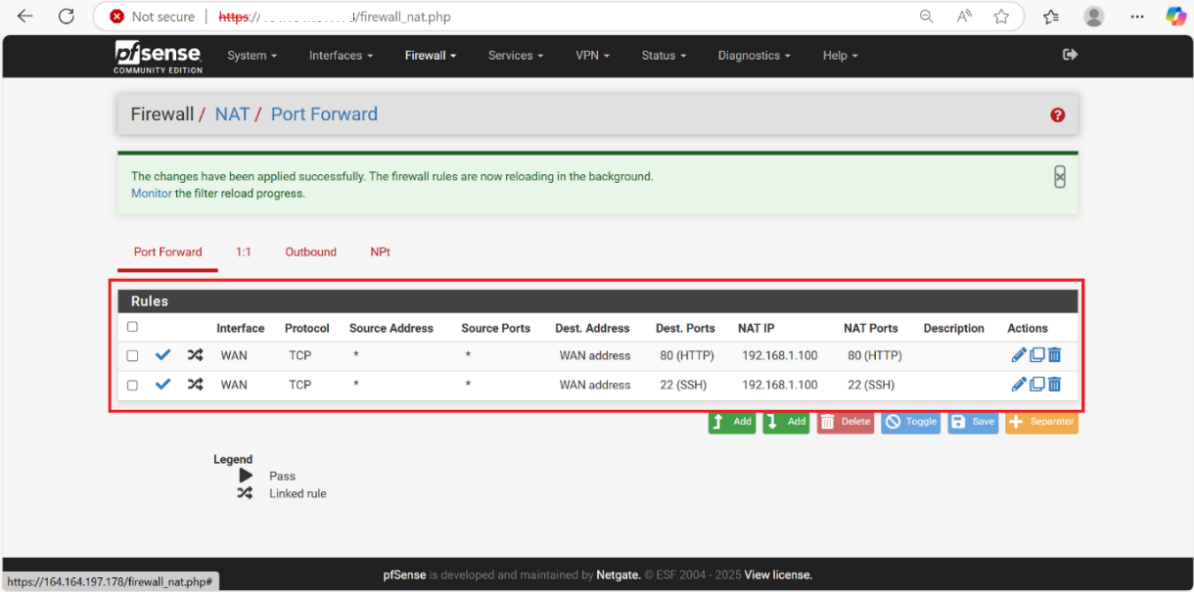
To expose both the web and SSH services running on the internal server, we configured two separate port forwarding rules in pfsense. The following section summarizes the key parameters of each rule and how they map external traffic on ports 80 and 22 to the private IP 192.168.1.100.
The following steps guide you through configuring both HTTP and SSH port forwarding rules in pfsense to ensure external traffic is correctly routed to the internal server:
- Open the pfSense NAT Port Forward settings by navigating to Firewall > NAT > Port Forward in the pfSense web interface.
- Add First Port Forwarding Rule (HTTP):
- Interface: Select WAN
- Protocol: Select TCP
- Source Address: Choose WAN address
- Source Port: Enter 80 (HTTP)
- Destination Address (NAT IP): Enter 192.168.1.100
- NAT Port (Destination Port): Enter 80
- Description: Add a meaningful label such as HTTP access.
- Add Second Port Forwarding Rule (SSH):
- Interface: Select WAN
- Protocol: Select TCP
- Source Address: Choose WAN address
- Source Port: Enter
22(SSH) - Destination Address (NAT IP): Enter 192.168.1.100
- NAT Port (Destination Port): Enter 22
- Description: Add a meaningful label such as SSH access.
- Save and Apply the Rules:
- After adding both rules, click Save.
- Then click Apply Changes to activate the rules in pfsense.
- Port Forwarding Rules:
- Port 80 traffic to the internal server for web (HTTP) access.
- Port 22 traffic to the internal server for SSH access.
WAN Rule at pfsense
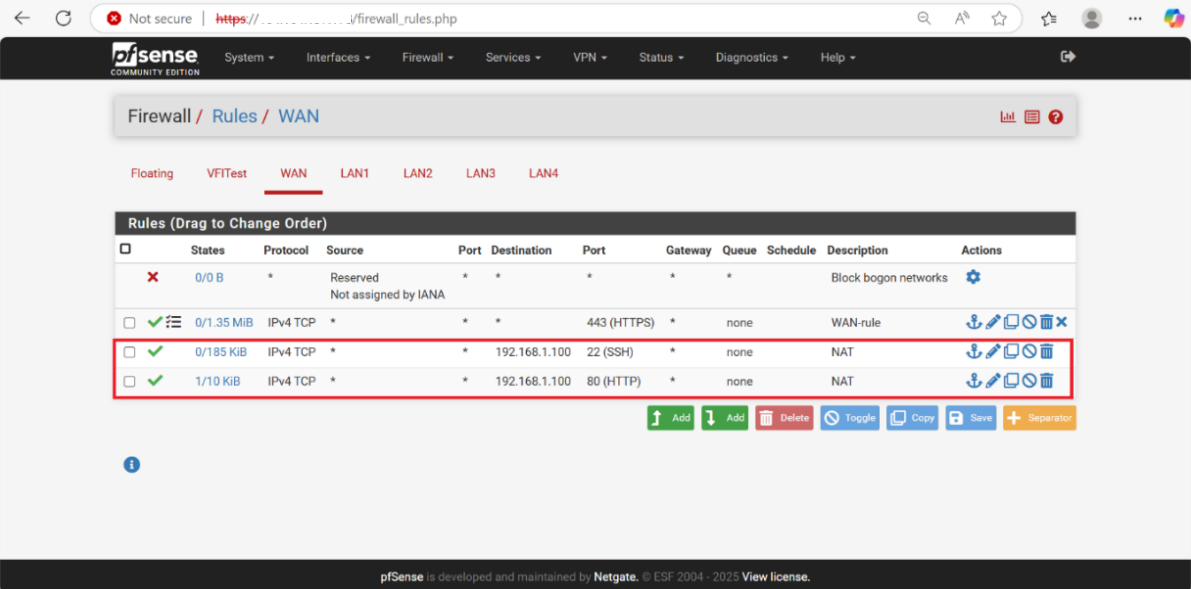
When port forwarding rules are added in pfsense, corresponding firewall rules on the WAN interface are automatically created to allow external traffic through the specified ports. These rules are essential for enabling access from the internet to internal services like SSH and HTTP.
The following steps help you verify and manage these auto-generated WAN rules to ensure proper traffic flow and security control:
-
Navigate to Firewall > Rules > WAN tab in the pfsense interface.
-
Review Automatically Created NAT Rules.
-
Two rules are created (based on the earlier port forwarding setup):
Rule 1: SSH Access
- Protocol: IPv4 TCP
- Destination Port: 22 (SSH)
- Destination IP: 192.168.1.100
- Description: NAT
- Purpose: Allows external SSH access to the internal server.
Rule 2: HTTP Access
- Protocol: IPv4 TCP
- Destination Port: 80 (HTTP)
- Destination IP: 192.168.1.100
- Description: NAT
- Purpose: Allows external HTTP (web) access to the internal server.
-
Confirm Rule Status:
- Ensure both rules are enabled (indicated by the green check icon).
- You can also edit or delete them from the Actions column if needed.